1) The internal cavity and shape of the workpiece should be as uniform as possible.
For example, the width of the shoulder retracting groove with the same diameter on the same shaft should be as uniform as possible, which can reduce the specification of the tool and the number of tool changes, and facilitate programming and improve the machining efficiency of the CNC machine.2) The radius of the transition between the groove and the edge of the workpiece should not be too small.
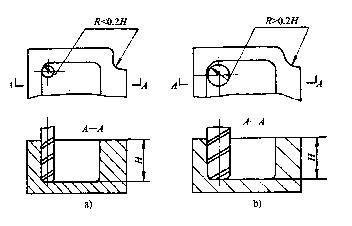
The transition fillet radius reflects the diameter of the tool. The ratio of the tool diameter to the depth of the workpiece is related to the stiffness of the tool, as shown in Figure 3a, when R < 0.2H (H is the depth of the contour of the workpiece being machined) ), it is determined that the machining process of the workpiece is poor; as shown in Fig. 3b, when R>0.2H, the equivalent rigidity of the tool is better, and the processing quality of the workpiece can be guaranteed.

Figure 3 Inner groove transition radius
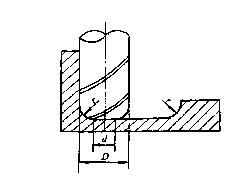
3) The radius of the bottom of the workpiece groove should not be too largeAs shown in Fig. 4, when milling the bottom plane of the workpiece, the larger the radius r of the groove bottom, the worse the milling cutter's edge milling ability is. The maximum diameter of the milling cutter in contact with the milling plane is d=D-2r (D For the diameter of the milling cutter), when D is constant, the larger the r, the smaller the area of ​​the milling end edge milling plane, and the ability to machine the surface is correspondingly reduced.

Figure 4 Corner radius of the groove bottom
4) Analyze the reliability of the part positioning referenceCNC machining should try to adopt a uniform reference positioning, otherwise the position error and shape error of the workpiece processing will be caused by the installation positioning error of the workpiece. If it is necessary to turn the workpiece on the CNC machine, it is better to use the machined outer circle or the machined inner hole as the positioning reference. If not, an auxiliary reference should be set. If necessary, add a process boss or a process hole to the blank, and then process the auxiliary reference after processing.
Previous page
Solid Tungsten Carbide Rod,H6 Ground Carbide Rod,Tungsten Carbide Rod Tools,Tungsten Carbide Rod For Endmill
Zhuzhou Kerui Cemented Carbide Co., Ltd. , https://www.carbide-china.com